DAY 24. Monochrome Graphics


novice intermediate advanced expert

Fundamentals

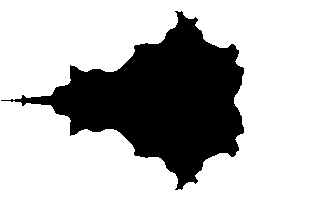
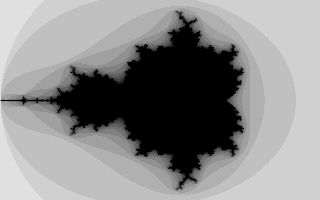
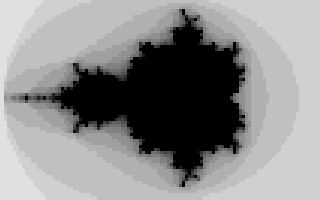
When we talk about graphics, we refer to something called the screen or the display. The screen is composed of thousands of tiny dots called pixels, which can assume various visual states and so create some kind of image. There are three aspects to a pixel that have a major impact on what the display is capable of showing. One is the screen size. The screen size is usually given as the number of pixels that make up a full row and column of the screen and relates the number of pixels that comprise the screen — the more pixels the better because we get a larger and more versatile area to work with. There is also resolution, which is the size of each individual pixel. A very poor resolution yields images that are blocky and highly rasterized, while a higher resolution gives displays that are finer, even though the screen may have the same dimensions.

High resolution
Low resolution
The final aspect is the number of colors that a pixel can display. This is almost as important as resolution for picture quality because more colors may capture detail and give the illusion of a higher resolution. TV sets have worked with this philosophy for decades. Monochrome graphics have the very unenviable capability of two colors; technically, a color and nothingness.

16 colors

Monochrome
(detail has been lost)

The TI-83 Plus has an LCD screen with pretty bleak dimensions of 96×64 pixels, and a blocky resolution (about 45 pixels to the inch).

The Graph Buffer

The graph buffer is intimately connected to the display, because the graph buffer's contents is a representation of the LCD screen. The start of the buffer is equated to PlotSScreen and is 768 bytes in size. You might wonder where this magic number came from. Well, we have a screen that is 96 pixels wide and 64 pixels tall. That's 6144 pixels total. Now because the screen is monochrome, each pixel can assume only two possible states: "light" (0) and "dark" (1). We can then maintain one pixel with just one bit, packing eight bits/pixels into one byte. As a result, the total memory space required is 6144÷8 = 768 bytes. The graph buffer is best thought of as a byte array of dimensions 12×64 (12 columns, because eight pixel columns can be packed into one bytes).

You can load data to and from the graph buffer as it's normal memory, but the peculiar hardware of the calculator will not automatically update the display if you do so. There is an OS routine to do this.
_GrBufCpy Copies PlotSScreen to the display.
DESTROYS All

N.B. The ClrLCDFull command does not clear out the graph buffer. To have a true erasure, you have to zero out the buffer yourself.

Program 24-1

I'm such a sycophant...
    LD     HL, picdata
    LD     DE, PlotSScreen+(19*12)    ;Start at nineteenth row of display
    LD     BC, 25*12                  ;25 rows of data
    LDIR                      
    b_call(_GrBufCpy)
    RET

picdata:
    .DB    $00, $00, $00, $00, $00, $FE, $00, $00, $00, $00, $00, $00
    .DB    $00, $00, $00, $00, $00, $FE, $00, $00, $00, $00, $00, $00
    .DB    $00, $00, $00, $00, $00, $FE, $30, $00, $00, $00, $00, $00
    .DB    $00, $00, $00, $00, $00, $FE, $78, $00, $00, $00, $00, $00
    .DB    $00, $00, $00, $00, $00, $FF, $30, $00, $00, $00, $00, $00
    .DB    $00, $00, $00, $00, $00, $FF, $07, $E0, $00, $00, $00, $00
    .DB    $00, $00, $00, $00, $00, $FF, $77, $E0, $00, $00, $00, $00
    .DB    $00, $00, $00, $00, $00, $FF, $77, $E0, $00, $00, $00, $00
    .DB    $00, $00, $00, $00, $00, $F8, $61, $E0, $00, $00, $00, $00
    .DB    $00, $00, $00, $00, $1F, $F8, $E3, $E0, $00, $00, $00, $00
    .DB    $00, $00, $00, $00, $7F, $F8, $E3, $F0, $00, $00, $00, $00
    .DB    $00, $00, $00, $00, $7F, $FE, $EF, $F0, $00, $00, $00, $00
    .DB    $00, $00, $00, $00, $3F, $FE, $CF, $F0, $00, $00, $00, $00
    .DB    $00, $00, $00, $00, $1F, $FD, $DF, $F0, $00, $00, $00, $00
    .DB    $00, $00, $00, $00, $0F, $FD, $DF, $F0, $00, $00, $00, $00
    .DB    $00, $00, $00, $00, $07, $FC, $1F, $F0, $00, $00, $00, $00
    .DB    $00, $00, $00, $00, $07, $9C, $0F, $C0, $00, $00, $00, $00
    .DB    $00, $00, $00, $00, $03, $0E, $0F, $00, $00, $00, $00, $00
    .DB    $00, $00, $00, $00, $00, $0F, $FE, $00, $00, $00, $00, $00
    .DB    $00, $00, $00, $00, $00, $07, $F8, $00, $00, $00, $00, $00
    .DB    $00, $00, $00, $00, $00, $07, $F8, $00, $00, $00, $00, $00
    .DB    $00, $00, $00, $00, $00, $03, $F0, $00, $00, $00, $00, $00
    .DB    $00, $00, $00, $00, $00, $03, $F0, $00, $00, $00, $00, $00
    .DB    $00, $00, $00, $00, $00, $01, $F0, $00, $00, $00, $00, $00
    .DB    $00, $00, $00, $00, $00, $00, $F8, $00, $00, $00, $00, $00

Plotting Pixels

The pixel is the most primitive graphic you can draw. The packed structure makes manipulating individual pixels cumbersome, but just think of it as an opportunity for more coding experience ^_^.

The following is the GetPixel routine that forms the basis for pixel plotting, and in fact all drawing in monochrome. Given the x-location in A and the y-position in L, it outputs in HL the address of the byte the pixel resides in, and a bitmask in A of some kind. What is the need for a bitmask? Well, knowing the byte of the buffer the pixel is in is only half the story. We have to identify the exact bit, hence the bitmask.

GetPixel:
    LD     H, 0
    LD     D, H
    LD     E, L
    ADD    HL, HL
    ADD    HL, DE
    ADD    HL, HL
    ADD    HL, HL

    LD     E, A
    SRL    E
    SRL    E
    SRL    E
    ADD    HL, DE

    LD     DE, PlotSScreen
    ADD    HL, DE
Since the graph buffer is a 12×64 array, multiply the y index by 12. Now we must add the x index to find the byte, but because there are eight pixels to a byte, the x-position must be divided by 8. Then the base address of the buffer is added. I really shouldn't have explained this, since it's a standard array indexing, but the division by 8 might have thrown you.
    AND    7
We already have the byte, now we want the bit. Turns out we can get it by moduloing the x-position with 8.
    LD     A, $80
    RET    Z
    LD     B, A
Loop:
    RRCA
    DJNZ   Loop
    RET
The result of the AND 7 gave us the position of the pixel in a byte as:
0 1 2 3 4 5 6 7
One byte
Therefore we can create a bitmask by rotating $80 right by the bit number.

Using GetPixel

If you know anything about bitmasking, you should already see what you can do with GetPixel. You can darken a pixel, toggle it, or lighten it using the appropriate boolean instruction.
; Darken a pixel
CALL   GetPixel
OR     (HL)
LD     (HL), A


; Flip a pixel
CALL   GetPixel
XOR    (HL)
LD     (HL), A
But you cannot be so cavalier with AND. The bitmask must first be inverted, otherwise the other seven pixels will be cleared.
; Lighten a pixel
CALL   GetPixel
CPL
AND    (HL)
LD     (HL), A
This is not to say you couldn't use AND alone. In such a case, if the pixel in the buffer is on, Z will be cleared; you can test the status of pixels.

If you get all that, pat yourself on the back, because you now know enough to make a game of Nibbles!!

Lines

A line-drawing routine that connects any two points is way to difficult to explain, but special cases of lines with horizontal and vertical slopes aren't too bad, so...

Horizontal Lines

A horizontal line could be drawn by a loop of GetPixels, but that is way too slow. A better method is to look at how a line looks as bits in the graph buffer.
                                                                     
A horizontal line can be divided into three sections. The left part contains zeros in the H.O. bits and ones in the low order. The middle part contains all ones. The right part contains ones in the H.O. bits and ones in the low order. The challenge, then, is to figure out what should go into the left and right parts, how many middle sections there are, and watching out for special cases:
                                 
Right part absent
                                 
Left part absent
                                 
Middle part absent
               
Left and Right parts combined
I get the feeling I haven't really challenged you very much for the past 3 weeks, so now I leave the coding of a horizontal line drawer up to you (*evil*). Just remember, shift instructions and bitmasks are a monochrome graphics programmer's best friends.

Vertical Lines

Vertical lines are much easier to draw than horizontal lines, mainly because we're forced to plot them pixel by pixel. Since we have to do the same bitmasking operation on each byte in a column, we actually only need to run GetPixel once, then apply the mask as many times as necessary.
; Draws a vertical line from (D, L)-(D, E)

    LD     A, E
    SUB    L
    RET    Z
    PUSH   AF        ; Find and store vertical length of line

    LD     A, D
    CALL   GetPixel

    POP    BC        ; Now B = number of pixels to draw
    LD     DE, 12     ; There are 12 bytes between rows
    LD     C, A       ; Save the bitmask because it will get obliterated

PlotLoop:
    LD     A, C
    OR     (HL)
    LD     (HL), A
    ADD    HL, DE
    DJNZ   PlotLoop
    RET


This is part of Learn TI-83 Plus Assembly In 28 Days
Copyright (c) 2002, 2003, 2004 Sean McLaughlin
See the file gfdl.html for copying conditions